If you are planning to install a shed on your property in Arkansas, the single most important step is preparing a proper concrete pad. A well-built concrete pad for shed preparation drainage Arkansas requires careful attention to local soil conditions, frost depth, and heavy rainfall patterns. Without a solid foundation and effective drainage, your shed can shift, crack, or hold moisture that damages both the slab and your stored items. This guide walks you through every critical step to ensure your shed foundation lasts for decades.
Why Arkansas Soil and Climate Demand a Proper Concrete Pad
Arkansas presents unique challenges for any concrete project. The state experiences hot, humid summers and occasional freeze-thaw cycles in winter. This combination of moisture and temperature fluctuation puts stress on concrete slabs. Expansive clay soils are common in many parts of Arkansas, including the Batesville area. These soils swell when wet and shrink when dry, which can cause a poorly prepared pad to heave or settle unevenly. A concrete pad for shed preparation drainage Arkansas must account for these conditions from the start.
Additionally, Arkansas receives significant rainfall throughout the year. If water pools around your shed foundation, it can seep beneath the slab and cause erosion or frost heave. Proper grading and drainage are not optional features. They are essential components of a durable shed base. By investing in a professionally installed pad, you protect your shed investment and avoid costly repairs down the road.
Key Elements of a Durable Shed Foundation
Building a concrete pad that withstands Arkansas weather involves several critical steps. Each stage contributes to the overall strength and longevity of the foundation. Skipping any of these steps can lead to problems within a few years.
Site Selection and Ground Preparation
Before pouring any concrete, you must choose the right location for your shed. Look for a spot that is naturally higher than the surrounding ground to promote water runoff. Avoid low areas where water collects after rain. Once you select the site, clear all vegetation, rocks, and debris. The ground should be level and compacted. Excavate to a depth of at least 6 to 8 inches to remove topsoil and organic material, which can decompose and cause settling. For larger sheds or those storing heavy equipment, excavation depth may need to be greater.
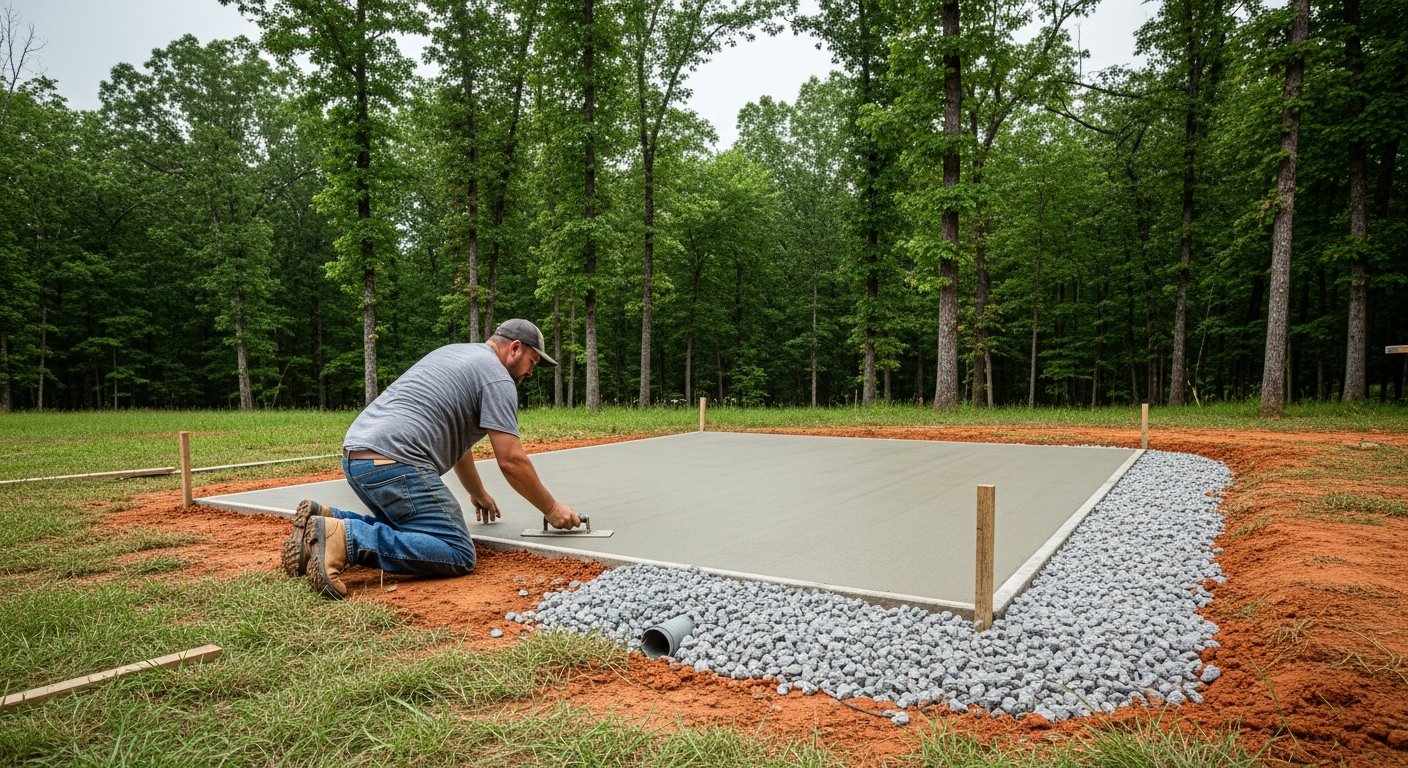
After excavation, add a base layer of crushed stone or gravel. This layer serves two purposes. It provides a stable, compacted surface that distributes weight evenly. It also acts as a drainage layer, allowing water to move away from the concrete rather than pooling beneath it. In Arkansas, where rain is frequent, a 4-inch gravel base is the minimum recommendation. For sheds over 100 square feet, consider 6 inches of compacted gravel. This base is the first line of defense against moisture problems.
Proper Drainage Techniques for Arkansas Conditions
Drainage is the most overlooked aspect of shed pad construction. A concrete pad for shed preparation drainage Arkansas should include a slight slope away from the shed. A slope of 1/4 inch per foot is standard. This gentle pitch directs rainwater toward the edges of the pad, preventing puddles. The gravel base mentioned earlier also helps by creating a capillary break that stops moisture from wicking up into the concrete.
For sheds located in low-lying areas or near slopes, additional drainage measures may be necessary. French drains or perimeter drains can be installed around the pad to capture and redirect subsurface water. These drains consist of perforated pipe surrounded by gravel, which carries water away from the foundation. If your shed site has poor natural drainage, consider installing a drainage system before pouring concrete. It is much harder to add drainage after the fact.
Reinforcement and Concrete Mix Design
Concrete alone is strong in compression but weak in tension. In Arkansas, where soil movement is common, reinforcement helps the pad resist cracking. The two main options are welded wire mesh and rebar. For most shed pads, a 6×6 inch welded wire mesh placed in the middle of the slab provides adequate strength. For larger sheds or those on unstable soil, use 1/2 inch rebar spaced 16 inches apart in both directions. The reinforcement should be suspended off the ground using small concrete blocks or wire chairs so it sits within the concrete rather than at the bottom.
The concrete mix itself matters. Use a mix with a compressive strength of at least 3,000 psi for a shed pad. A 4,000 psi mix is better for heavy-duty storage or workshops. Add air-entraining admixtures to help the concrete resist freeze-thaw damage. In Arkansas, where winter temperatures can dip below freezing, air-entrained concrete lasts longer and spalls less. Discuss your project with a trusted concrete supplier or contractor to get the right mix for your specific needs.
Step-by-Step Process for Pouring a Shed Pad in Arkansas
Following a systematic process ensures your concrete pad for shed preparation drainage Arkansas meets all requirements. Below is a step-by-step guide that covers the entire installation from start to finish.
- Mark and excavate the area. Use stakes and string to outline the pad dimensions. Excavate to a depth of 8 inches, removing all organic material. Compact the exposed soil with a hand tamper or plate compactor.
- Install forms. Use 2×4 or 2×6 lumber to create the perimeter of the pad. Ensure the forms are level and square. Brace them with stakes driven into the ground.
- Add and compact gravel. Spread 4 to 6 inches of crushed stone or gravel. Compact it thoroughly with a plate compactor until it is firm and level. This base layer is critical for drainage and stability.
- Place reinforcement. Lay welded wire mesh or rebar on small supports so it sits in the middle of the slab thickness. Overlap mesh sheets by at least 6 inches and tie them together with wire.
- Mix and pour concrete. Order ready-mix concrete or mix on-site. Pour the concrete evenly into the forms. Use a rake or shovel to spread it. Work quickly to avoid the concrete setting before it is placed.
- Screed and float. Use a straight 2×4 to screed the surface, removing excess concrete and filling low spots. Then use a bull float to smooth the surface and bring fines to the top.
- Finish the surface. For a non-slip finish, use a broom to texture the concrete. Allow the surface to firm up slightly before brooming. A broom finish is ideal for shed floors because it provides traction even when wet.
- Cure the concrete. Keep the concrete moist for at least 7 days. Cover it with plastic sheeting or apply a curing compound. Proper curing prevents cracking and ensures maximum strength.
Each step requires attention to detail. Rushing the process or skipping compaction can lead to problems later. If you are not experienced with concrete work, hiring a professional contractor is a wise investment. In our guide on concrete driveways and sidewalks in Arkansas, we explain how to evaluate local contractors and ensure high-quality results.
Common Mistakes to Avoid
Even experienced DIYers can make errors when building a shed pad. Here are the most common mistakes and how to avoid them.
- Insufficient gravel base. Skimping on gravel leads to poor drainage and settling. Always use at least 4 inches of compacted crushed stone.
- No reinforcement. Unreinforced concrete cracks easily in Arkansas soil. Always include wire mesh or rebar for strength.
- Poor slope. A flat pad holds water. Ensure a 1/4 inch per foot slope away from the shed structure.
- Neglecting curing. Concrete that dries too fast loses strength. Cure the slab for a full week.
- Ignoring local codes. Some Arkansas jurisdictions require permits for sheds over a certain size. Check with your county building department before starting.
Avoiding these pitfalls saves time, money, and frustration. If you are unsure about any step, consult a professional. The cost of hiring an expert is small compared to the expense of replacing a failed foundation.
When to Hire a Professional Contractor
While a small shed pad might seem like a straightforward DIY project, several factors make professional installation worthwhile. Experienced contractors understand local soil conditions, know how to achieve proper compaction, and have the tools to place and finish concrete efficiently. They also handle drainage solutions that may be beyond a typical homeowner’s expertise. For a concrete pad for shed preparation drainage Arkansas, hiring a local contractor like The Real Deal of Batesville means you get a foundation built to last.
We offer concrete pouring and finishing services throughout Batesville and surrounding areas. Our team assesses your site, recommends the best drainage approach, and installs a reinforced slab that meets all local requirements. We use air-entrained concrete mixes designed for Arkansas weather and ensure proper slope and curing. Whether you need a small pad for a garden shed or a large foundation for a workshop, we deliver results that protect your investment.
Building a shed is an exciting project that adds storage and value to your property. By investing in a properly prepared concrete pad with effective drainage, you ensure your shed remains level, dry, and functional for years. Take the time to plan ahead, choose the right materials, and work with professionals who understand Arkansas conditions. Your shed will thank you.